Tuesday, January 31, 2012

Vacuum forming on the cheap


Vacuum formed cars. They sucked.

For a long time now I've been planning a small tutorial on how to build and use a inexpensive vacuum former. You can make a lot of things with a former, but I'm going to show you how to copy cars to use as terrain. This idea was the inspiration for my project.


The Materials

1/2 " MDF board, about 24 in square
A high suction vacuum with the hose( I used a Shark I got from goodwill. Don't laugh, its got some power!)
PVC elbow that fits your flange and your vacuum hose
3/4 " weatherstripping
plastic or acetate
3/4 to 1-1/2 wood for your frames
screws, glue, wingnuts
4 sturdy plastic cups or blocks to use as risers
metal window screen
shelf brackets
Plastic for sale signs or other thin polystyrene
GOOD VENTILATION


There is a lot of info on how to build a vacuum former and the concept of its uses available on the Internet. I strongly suggest you reference other materials besides my amature how-to. Our end goal is to build this:

Please note: Your end results may vary. I'm not responsible for your project not turning out, your house burning down or any bodily harm you might cause on yourself or others. Use your brain, be safe, and don't try this if your unsure of any aspect of it.

Monday, January 30, 2012

Modern building made from Dollar Tree container

A while back I bought a foldable storage bin from Dollar Tree because it looked interesting as a possible building. Well, after some re-working this is what I have so far:

Front side- I havent finished the doors yet.
Back side- the door is hinged and opens
This is the second floor. When the roof comes off, the outside walls go
with it leaving an open floor plan. That design was dictated a bit by the
plastic crate, but I really like it.

This is the ground floor. Notice that the second floor comes off by itself.
In the back left corner you can just see the stairs.
 I haven't glued down any of the interior walls yet, that will happen after painting. Also please excuse the poop colored roof, i needed a thick paint for a tar and stone roof technique and that paint was the thickest I had. The more I look at it though, the more I dislike it and probably will change it soon.
As far as uses this is going in my town that I m building; usable for zombie games, Combat Zone, some post apocalyptic and the like.

Let me hear from ya,
Papa Spanky

Sunday, January 29, 2012

15 feet of post apocalyptic highway


Ok this is is what 15 feet of road sections look like all together. I never did a how-to on these, and honestly I dont think I will as this wasn't my most stellar of  projects. Dont get me wrong, I like the way these turned out, but they could have been better. Why? Well the main reason is the base. I based these on foamcore board and, try as I did to prevent it, some of them still warped. Iv'e been making terrain for 16 years now. I know better.  MDF should be the only thing you base larger terrain projects on, ever. Oh well, maybe some day I'll redo them ...

Monday, January 2, 2012

3 more cars finished

I realized as i posted my battle report that I never posted the updated pictures of the last cars I was working on, so here they are.


Enjoy,
Papa Spanky


Adventures in the Lost Lands Battle report


This Christmas my wife got me “Adventures in the Lost Lands” by Two Hour Wargames. From the minute I unwrapped it, my kids told me that they wanted to play it since it looked cool with the dinosaur on the cover. I decided we would have an impromptu game on New years Day. Not having any Pulp style figures, dinosaurs or finished jungle terrain however proved to be a bit of a problem. So we improvised and 
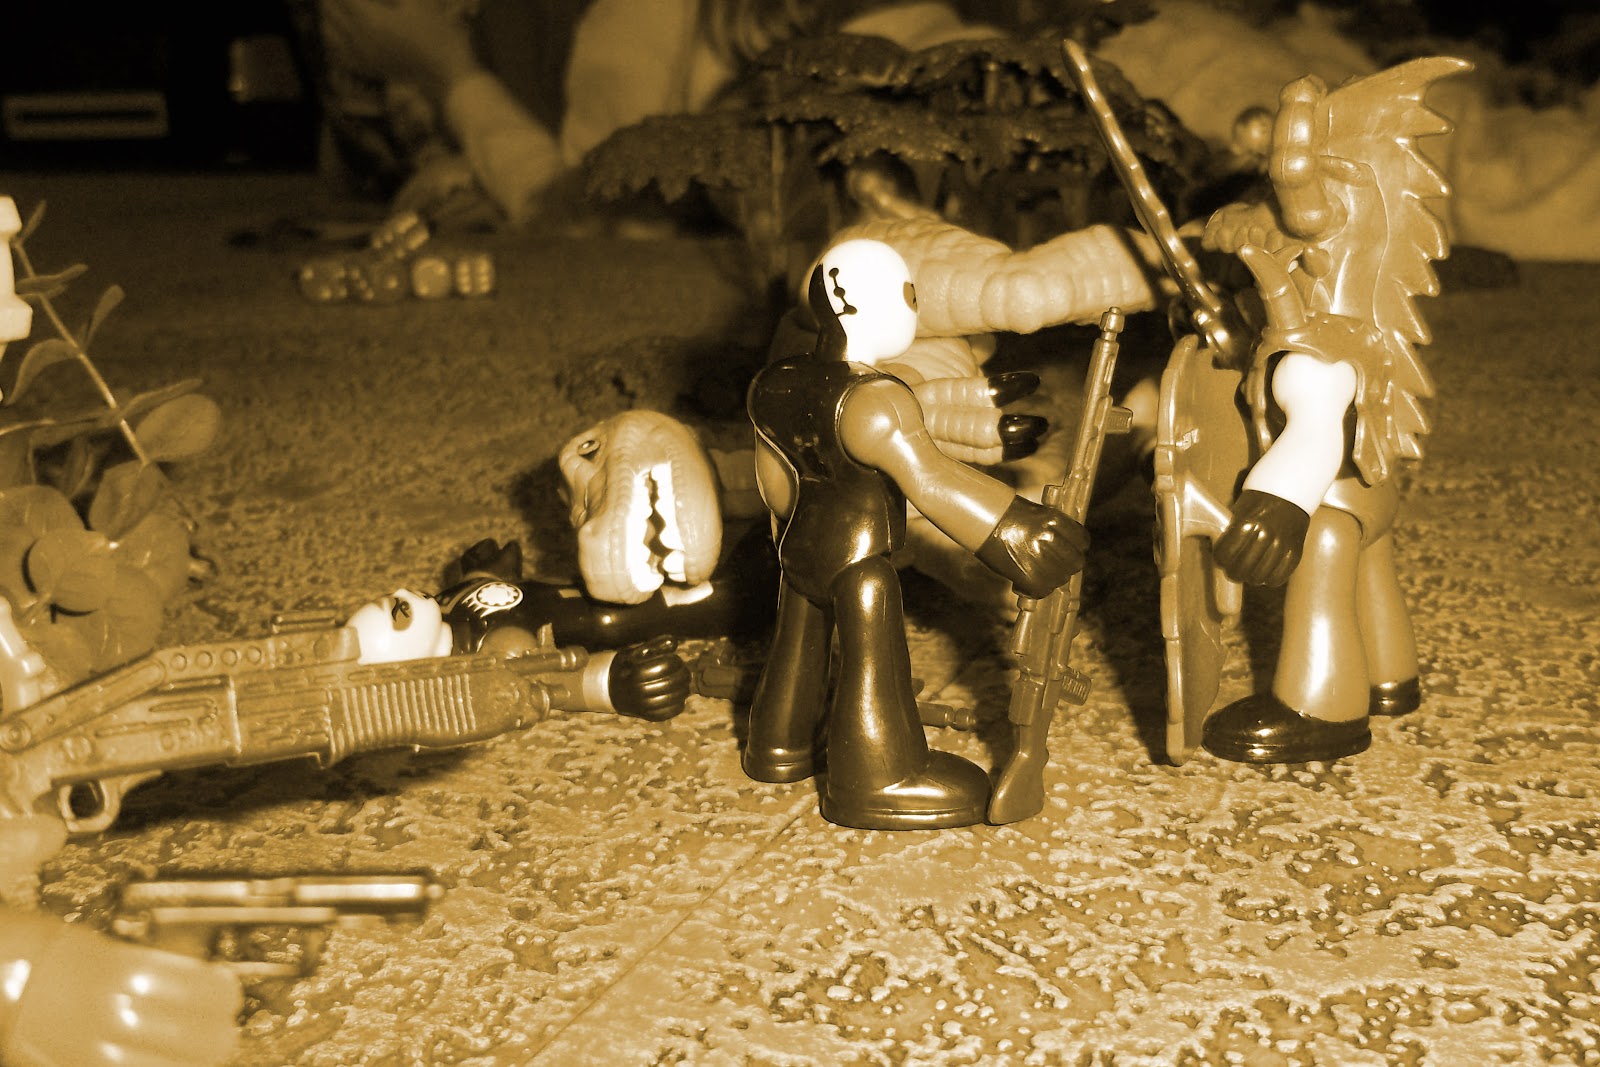
used my sons Imaginex figures! For jungle terrain I used my frocks, some plastic trees and handfulls of unbased, unfinished foliage I had for when I actually do sit down and make jungle terrain. Since this was a learning game, I limited our teams to one star and two civilians; if they were armed with a gun it was a big game rifle and if they had a close combat weapon it was a generic edged weapon.

The Game started out with all the teams cautiously advancing. The fist encounter turned out to be a flock of birds that did nothing more than startle the groups. But just as they calmed down, CONTACT! A Greenasaurus (thats what my youngest called it) charged out from behind a rock. Quick firing and working as a group made short work of the beast. My daughters star character lopped off the dinos head, but not before it killed one of her gunmen.


 A turn later and the scent of blood rule brought out more trouble, this time a T Rex(ish).


 The T Rex advanced under a torrent of fire from all groups un-phased. The Winter Dark Knight (Batman, run by me) charged at the beast while the Mr. Freeze twins provided cover fire. Spurred on by The Dark Knights bold move, others joined him in the assault. My daughter, still giddy from her earlier success, declared “ I want my guy to jump on that rock, onto his (T Rex) back and stab him from behind.” We discussed how hard that would be, assigned a roll value, and she succeeded!


Unfortunately, she was unable to do any damage and the Rex shook the star off next turn, causing him to hit his head in a rock and be knocked out for a turn.


T Rex seemed to be unstoppable as he wiped out all of my sons group, even swallowing his star whole. The Dark Knight also fell, but this distraction allowed both my daughters groups to get into a rear attack. One star scored a wound with shooting the same turn the rear attackers scored two more. The T Rex decide he could dish it out but not take it, and ran from the fight, right off the table.


 My son decided that since his star was in the stomach of the T Rex he Killed the dino from the inside and made his escape. Sure, sounds good!
A good time was had by all, there were some cinematic moments, and the kids were pretty patient while I flipped through rules.

Papa Spanky