Showing posts with label work in progress. Show all posts

Sunday, February 28, 2016

Sci-Fi shanties (and a product review)

For a long time I've had an idea about creating a futuristic shanty slum. The concept is that cheap, modular, habs are shipped to planets for terra formers, miners ect. After a while, maybe  these clusters of temporary homes become abandon or forgotten due to the economy collapsing, or war or something else equally devastating. People start doing what they need to survive  and a sci fi slum is created. 
I sourced some recycled materials for the main body of the habs. Mainly dairy tubs that are square. For the details I Purchased several different kits in the "do it yourself" section over at Laser Cut Card. Great kits, I highly recommend them, but you'll see that in the pictures. I tried to keep them somewhat the same, i.e. modular, but make them look as he residents have repaired or personalized them over time. 

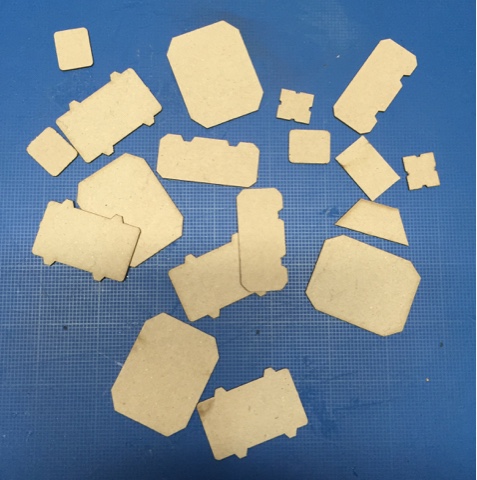
Some of the card details I made, and some are the "bonus" pieces you get from the Laser Cut Card kits. What do I mean by bonus? 

 These. These are the leftovers when you punch out the doors and windows. When you stack them and combine them with others they make great detail pieces. 
Here are a few more examples from thier door range, and their AC units.
 
Thanks for looking, comments welcome!
Papa Spanky

Saturday, January 18, 2014

The Devils Work

There is a saying that the devil is in the details. Well after the amount of time and energy spent on these seemingly little "details" I can see why.
 
Lets see what we got (Sorry about the jumbled picture subjects, I just took them as they were sitting on my workbench):
 
Fire hydrants, straw bales and some fall decor;


Dumpsters, trash cans, a beverage counter and more fall decor;
 

Chairs couches, and ice cream cooler (unfinished) an arcade game and some diner booths;
 
Lastly, these are going to be the streetlights that will be at the major intersections. I built and cast these, filling in the light with a 5mm half round jewel. A completely unnecessary and fiddly process to be sure, but its these little things that will hopefully make this board an exciting backdrop to my games.
 
Thanks for looking, questions comments always welcome!
Papa Spanky

Wednesday, January 8, 2014

First Deadzone test paint

I got in on the Deadzone Kickstarter a while back and received my package before Christmas. I finally got around to messing around with them a bit. The "restic" material they made these out of is a blessing and a curse. It glues well with superglue and is positionable with hot water. Cleaning flash off is nigh impossible though, as it can only be removed by cutting. Not scraping or sanding, but cutting. Sigh.
Anyway, I painted up a plague stage 3 as a test. I hate the bright purple pink they have as studio models and went with a more plagued look with greens yellows and dark reds.
He didn't turn out too bad, so I will keep with this scheme.

Comments welcome,
Papa Spanky

Monday, April 22, 2013

Casting Couch Diaries


I'm getting set to mold and cast my couch and a few other things I made, so I will be keeping track of progress (or lack of it) here. What did you think this post was about? Pervert.  Anyway there is a highway light post, a overstuffed chair, a couch, a trash can, a dumpster and its lids, (it still needs a bit of work) a computer monitor and flatscreen tv, and three turrets for Car Wars. I'll let you know how this turns out.
Papa Spanky

Sunday, September 2, 2012

Streetlights, people (oh oh ohhhhh!)


Today I finished up some streetlights for my town. I originally was going to cast my own, but for my own sanity I decided to purchase and modify some of the plasticville ones.
 Heres what I did:
 I clipped off the plastic bases from each pole. After that I used a dremel to smooth down the rough edges left from the base. Once those were done, I went about epoxying magnets into each base of the lights (fortunately they were hollow). After they dried I drilled tiny holes in the sidewalks of the boards at predetermined areas, and glued magnets into those. This was the hardest part as you need to keep the orientation of the magnets correct so the don't accidentally end up repelling each other. A quick rusty wash and a dull coat finish and these were done.


I will cast several of my scratchbuild lightpoles to put on the main drag on the south end of town. I just thought the plasticville ones were more subtle and saved a ton of time!

That covers the streetlights; now for the people. Two more for the population sign.


This gentleman is Danny Ling. A retired army reservist, he has lived in Gray Haven since he was 7 and will defend his home from all threats- foreign, domestic and other worldly.
Another stock Foundry model, I hated this one at first but when the paint went on it really grew on me. 


This guy is Dmitri. Just Dmitri. I thought he might kill me if I asked anything else.
Another stock foundry with some birch seeds on the base. Made em from my own tree! Honestly I had trouble with a back story for him, so that's why his is kinda lame.

There was something else I wanted to show you guys, what was it...

Oh yeah I finished the massive Mysterious East building!

This an import- export business located right next door to the Hydracorp building, and it opened about 3 months after Hydracorp moved in. Coincidence?...
I thought this building/ business would do good to forward many pulp or horror story lines. Practically anything can show up in town from all over the world and now have a plausible reason. Sometime in the future I might do a basement to this building and have it connect to Hydracorp and an underground bunker/lab/facility. This would all be on a separate board of course!
The front office. clear acetate line the windows. 
The rear storage and shipping area. Frosted acetate back here so no one can really see in!
The roof is in two separate pieces, one for the front and one for the back. I made it that way because it was easy to build and now i can use it to hide the storage area from players if needed. 
The rear loading area. 
Those following along will remember this building was made from storage crates, like the Hydracorp one was. It was a bit more persnickety having difficult cuts for the L shape. 

 For my parting shot I give you Gray Haven in its unfinished glory. I added a few things that might become permanent for the shot. 

Don't stop believin'   
Papa Spanky

Thursday, August 9, 2012

Gray Haven board and building progress

I've been brought low with a nice summer cold the past few days so I thought I would take some time to do some much needed progress updates. 


An aerial shot of all three boards together. From here you can see all the drains, sewers and weeds I added, as well as the no parking zones.  


A closer look at the grass median. The trees are real branches and the bushes are Woodland Scenics HO trees. The grass itself is fake rabbit, or teddy bear fur, first seen here . I finished it off with Silflor grass clumps for weeds and fall colored scatter from Woodland Scenics.
Jones and a PT Cruiser face off. My money is not on the Cruiser.  
Another view of the median, I like this shot.

A detail shot of the median, and one of the original drains that made it onto the board. 

Damn Porsche drivers think they can park anywhere...
Just because.

And now its onto the buildings. 


Here is the Post Office, almost finished. I'm waiting on some acetate for the windows and door. It has a decent interior, I'll show it off when its final. 


Progress shots of the police and fire stations. I made the roof of the PD with watercolor paper. 


The back of the PD and FD. I attached a plasticville firehouse to the back of the police station to give it a little more depth. The garage doors will be used as the sally-port for the prisoners. 

 An overview of everything as it is so far. The area behind the PD/ FD will be an open fenced area with maybe a radio tower in it or parking. The other areas are still open for building suggestions. Obviously a gun store is a must. I was also thinking of a small market or convenience  store. I will show off the Hydracorp building at the top later. 

Thanks for looking, questions and comments always welcome!
Papa Spanky


Wednesday, August 8, 2012

Drains, sewers and dumpsters

A while back I mentioned I was going to sculpt and cast my own sewers and drains. I even sculpted some and cast a few drains. Well, I wasn't really happy with the casts and the sewer covers were just too big. So I used the few cast drains I had and set about scratch building something new everything.


This is the drain. its simple four pieces of wire glued to plastic card and cut into the street and curb.

Here is the sewer cover. This is a small plastic button used to cover screw holes in furniture. I drilled holes and inscribed circles to add some detail.


a few more shot for your viewing pleasure.

Now this will get cast somehow, sometime. Its an empty dumpster with lids. I want to make a few and model them either full, empty, lids open or closed, with zombies in them, etc.

 
Thats all for now, Q&C welcomed as always!

Papa Spanky

Sunday, June 3, 2012

10,000 Page view party!

I hit 10k in page views and to celebrate, I thought I would share some update pics with everyone. (OK really I didn't have anything else to share...)

I'm close to being finished with two more 2'x4' boards. I haven't put in the sewer covers or drains as they aren't cast yet, and I may re-sculpt them anyway. Here's the three all together...

...and with the buildings I've either finished or am working on.
The two buildings in the middle are the Police and Fire Departments.

A closer shot of where the strip mall in its location, and the unfinished decorative median in the street.

Lastly, I re-did the grassy knoll to make it more suitable for the fall seasoned theme this board will have.

Thanks for looking 10,000 times!!!
Papa Spanky

Saturday, April 7, 2012

A review- Four Pack of Shops

Today I'm doing my first review (yeah me!). I decided that occasional reviews of products I use will be good for me and my loyal few viewers. I will share my take on whats good, whats meh, and whats really bad, and you can do with that information what you wish.

First victim, er product review is for Demo's Laser Cut Design four Pack of Shops.
I purchased these off of Ebay, for 32.00 +10.95 shipping. In the package you get:
4 different store front walls
3 different store rear walls (4 total)
2 different side walls (8 total)
4 roofs
8 short roof edges
8 long roof edges
parts to make 2 different style of awnings
4 bases
a laser cut sheet of window frames/ signs
8 sign braces
4 different doors (8 total)
8 door frames
instructions

 Sorry I forgot to put in the one door...

These buildings were put together in about 2 hours with no problems. The MDF they are made out of is not something I've seen before, but it is sturdy, flat, has a slight texture (almost like paper pulp) and cut with precision to fit almost seamless. The doors bases and frames are made from a type of plywood.
Since reviews are new to me, I'm going to try to separate into a pro and con group and give an overall rating after that.
PROS:


The instructions for these models are great. They are clear and concise with both diagrams and pictures, multiple ways to square your building, and plenty of modeling tips. As I mentioned earlier, I put these together in about two hours. You could have four painted buildings done in an afternoon.


The window frames are laser cut from a sheet of card stock. They fit well over the window edges, look really good, and the middle "cutout" can be used for building signs and posters.

The buildings are all the same size and shape with plain outside features; the customization comes from the ability to switch doors and door locations and the door fronts themselves. This is going to be listed as a con also, but for now I will explain why this is good. I like to customize. These models will, when they are all finished, have very distinct looks. If they were decorated with laser scribed bricks and detail, they might be more limiting on how you finish them. These are plain enough that they could be used in both a Midwest town and middle east settings.

The "puzzle piece" roof design fits on the building with very little seam and is easy to take on and off.

The sign brackets (pictured below) are my favorite part of these kits. I can think of a dozen uses for these off the top off my head, and there are enough to use elsewhere if you don't mind sacrificing a few signs for your buildings.


CONS:

The bases (pictured above) are made from plywood. They are cut out well with nice round edges, but because of the material I have one with a slight warp to it. Its not a problem for me as I do not plan on using them, but I would like to see bases made out of the same great material the walls are.


The buildings are all the same shape and size. (told you this would come up again) Not everyone customizes like I do. Even with the ability to change doors and door locations, the buildings tend to look the same. If there were optional building fronts, with different elevations ( IE a parapet or two of different heights)  it would make a huge difference in appearance. These could even be sold as an optional add-on kit. (hint hint)

The doors (and door frames) are too thick. The frames have to go on the outside of the wall, and stick out really far.  If the doors were half the thickness, that would fix the problem. I tried to make this a positive by drilling a hinge through the wall and door tab to make an actual working door, to no avail. the thickness of the door and hinge tabs prevented any kind of swing. I would be happier if the doors didn't have the tabs and the frames were made of card stock like the windows.

Conclusion: All in all, I really like these buildings. the cons are minor (to me anyway) and for a little more than $10.50 a building, you get some easy to build terrain that looks good as is, or you can customize it to your tastes.


Overall rating: 8.5 zombie heads out of 10


I hope this is helpful to someone.
Till next time,
Papa Spanky